TrashNet
Smart Trash Detection for Better Recycling

Background
Trash Recycling is a big problem in the United States alone. Every year, millinos of tons of trash is produced, a lot of which is recyclable. We're losing upwards of 75% of recyclables every year, which end up in a landfill rather than being recycled. There's a huge opportunity to minimize waste and reclaim the value of these recyclables.
CleanRobotics and TrashBot
TrashBot is a family of automated waste sorting bins produced by CleanRobotics. The idea behind TrashBot is to use the latest advances in AI and Computer Vision and Robotics to develop a product that can segregate trash more effectively than humans can.
CleanRobotics's current approach involves using single-class image classification to identify the trash items emptied into the TrashBot, and then use the underlying robotics to segregate it automatically. This leads to many problems, chief of which is not being able to do multi-class classification. You're also limited to only being to segregate one item at a time, severely impacting real world performance.
Dataset
As mentioned previously, the TrashBot currently works on an image classification model. The first task on the TODO list was to actually create a dataset suitable for object detection tasks. That meant going from per image label to per item bounding boxes and labels for items in each image in the dataset. I started by annotating the required ground truth boxes and class labels, creating an object detection dataset with roughly 8k images and upwards of 10k box annotations.
In total, there are 57 categories which make up the approximately 8k images. The range of objects per class if 7 at the lower end and upwards of 1300 at the higher end. The dataset is highly imbalanced, and I'll go into data augmentation and training time transforms below.
Edge Deployment
In its current iteration, the network employed by the TrashBot captures the incoming data, processes it and sends it to the cloud for inference. This has proven to be a performance bottleneck, and the team is planning to move to edge inference to allow for faster decision making. The edge platform that CleanRobotics works on top of is the Google Coral, which is a hardware family built on top of EdgeTPUs designed by Google.
This brings alongwith it a set of challenges. First off, the model needs to be small enough to fit on the device itself. Secondly, the model needs to be TFLite and EdgeTPU compatible.
The EdgeTPU instruction set still doesn't support a lot of the core operations needed to implement a majority of the current state of the art in object detection. It's also restricted to TFLite, leaving Tensorflow as the framework of choice when it comes to development.
TrashNet
Now that you have a sense of the task at hand, let me introduce the work I've done in this regard.
TrashNet is a collection of two models trained on the dataset described above. The first one is an EfficientDet, written in PyTorch, and the second one is an SSD MobileNet v2 model, trained using Tensorflow.
EfficientDet
EfficientDet is a family of object detection models that came out of Google Brain 1. It is based on the EfficientNet paper, which achieves best in class performance on the image classification task. EfficientDet has a scalable architecture while reducing the number of FLOPS by almost half and parameters by 10x.
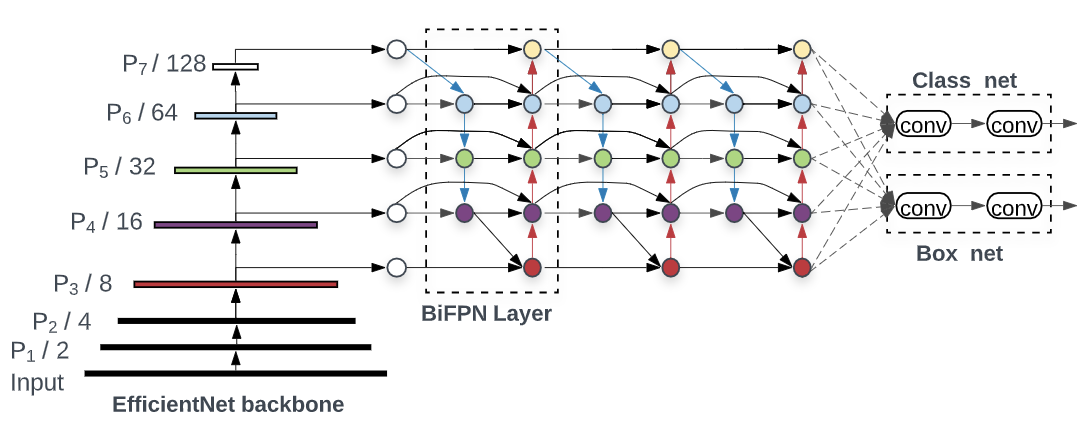
EfficientNet backbone
EfficientNet 2 aims to compound scale the network along multiple dimensions(width, depth and input resolution). Rather than only increasing one dimension at a time, EfficientNet expands the network along all dimensions. The authors use a compound scaling method to autmatically figure out the right scaling parameters, rather than manually turning the scaling coefficients.
Building from EfficientNet
EfficientDet builds on EfficientNet by adding a BiFPN(Bi-Directional Feature Pyramid Network) layer and a new compound scaling method to scale up the feature generation, resolution, backbone and the box/class prediction network.
BiFPN
A BiFPN aims to aggregate multi-scale features in a top-down manner. Conventional top-down FPNs are limited by the one way information flow. The authors of PANet added an extra bottom-up aggregation network. This comes at an extra computation cost.
The authors proposed further optimizations to make bi-directional feature fusion feasible. First, they remove nodes with a single input edge. Secondly, if the input and output node are at the same level, they added an extra edge from input to output node to fuse more features. Thirdly, they repeat the bidirectional path multiple times to allow for better feature fusion. The figure below presents the journey from an FPN to a BiFPN
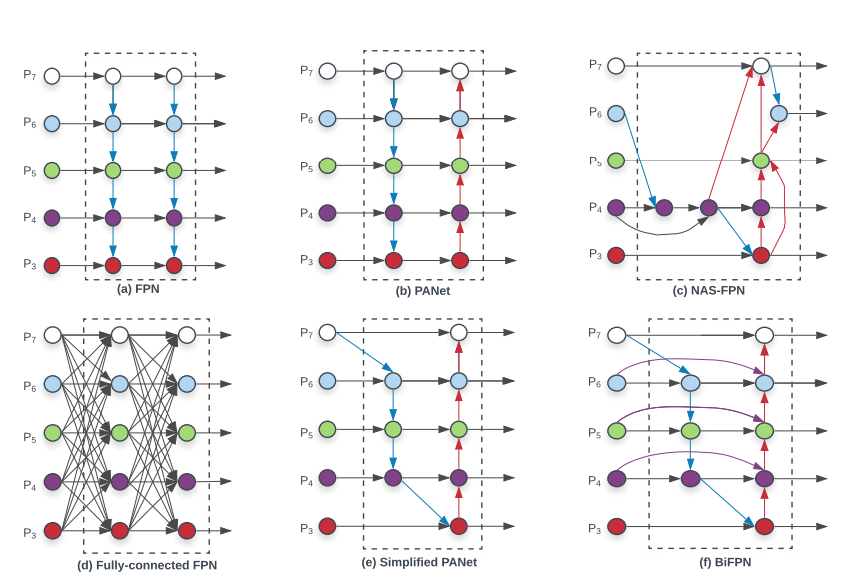
a. FPN top-down pathway for multi-scale feature fusion at levels 3->7
b. PANet additional bottom-up pathway building on from FPNs
c. NAS-FPN Neural Architecture Search
d. Expensive all to all feature generation
e. Simplified PANet by removing nodes with single input edge
f. BiFPN
For a review of Feature Pyramid Networks, check out this excellent introduction by Jonathan Hui on Medium
TrashNet - EfficientDet
This project only implements EfficientDet D0, foregoing compound scaling. After experimentation and trial runs using compound scaling, I found that EfficientDet D0 worked best. I hypothize this is because the dataset itself is small in size(roughly 8k images) and is highly imbalanced, leading to diminishing returns the more deeper the network got.
I use a pretrained EfficientNet backbone, trained on MS-COCO. This pretrained model is then used as the feature generator for the object detection task. The feature maps are then passed as inputs to the BiFPNs where they are fused together to learn multiple representations on the same input.
SSD MobileNet v2
Single Shot Detector networks, as their name suggests detect objects in a single shot. They don't do any kind of region proposals, nor do they mess around with feature fusion or input scaling.
Single Shot Detectors take a single pass for feature extraction. After going through a certain number of convolutions for feature extraction, you get a fixed number of bounding boxes for each location. The number of convolutions is dependent on the backbone network used for feature extraction.
MobileNets are the backbone network here and are used for feature generation. The output of a MobileNet is a high dimensional feature map, that then gets piped to a SSD detector via a 3x3 convolution.
MobileNet v2, again by the folks at Google, uses inverted residual blocks(with strides 1 and 2). MobileNets use bottleneck inputs and outputs and lightweight depthwise convolutions without non-linearities to maintain representational power.
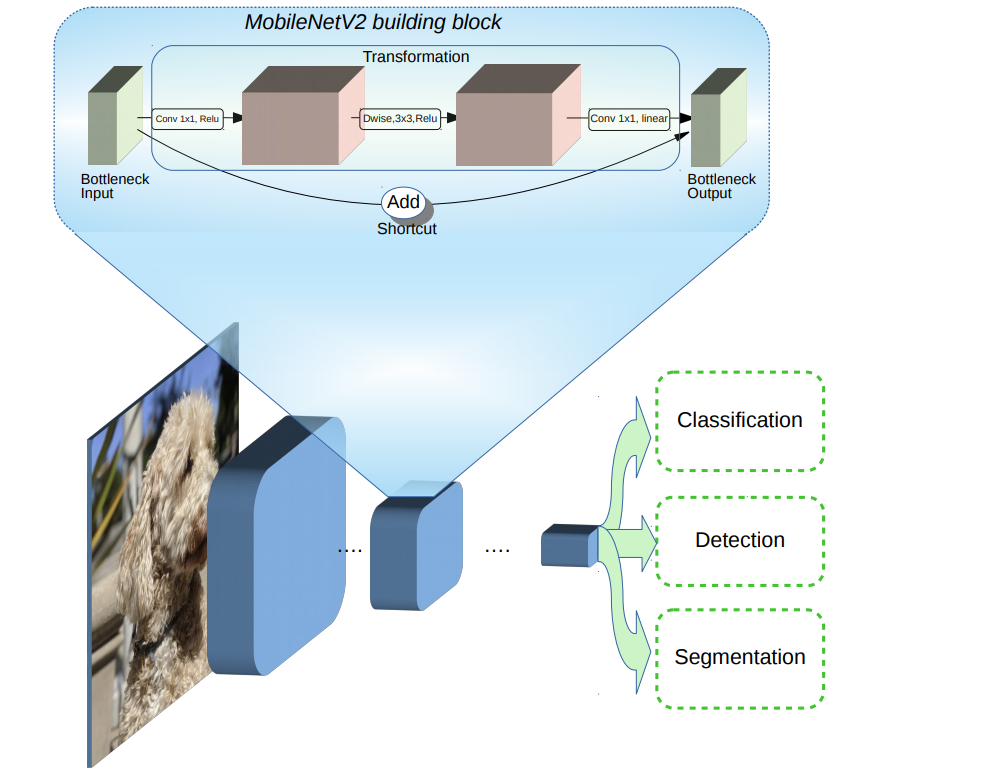
MobileNet v2 3 also introduces shortcut connections between the bottleneck inputs, enabling faster training and better accuracy. Their high throughput and small footprint makes them especially suitable for devices with limited computing power.
As of today, SSD MobileNets are the only explicitly supported family of object detection models on the Google Coral making them a natural choice. For more information on models supported by Google Coral, click here.
Class Imbalance
As mentioned above, the dataset I am working with is highly imbalanced. There are multiple ways to deal with class imbalance, the simplest and most difficult of which is getting more data. This is not always feasible and usually expensive. However, it is definitely possible to synthesize more data and that's the approach I've taken.
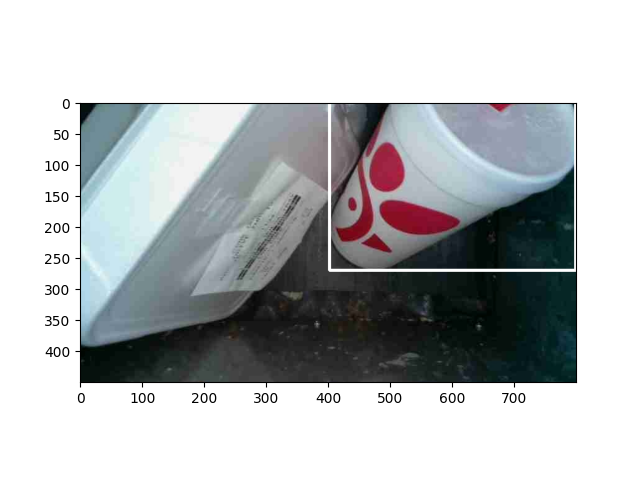
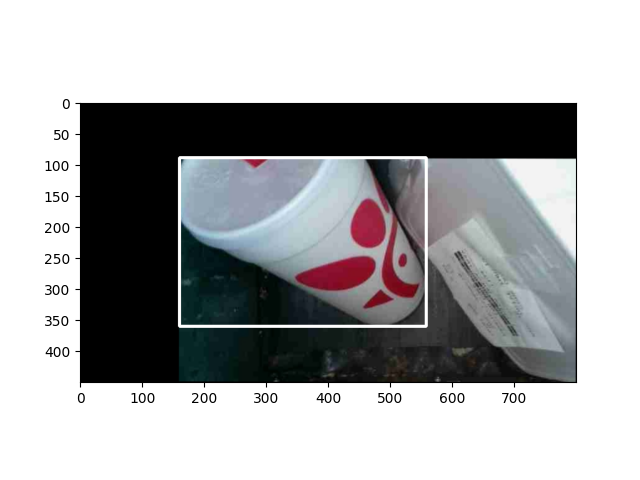
After the dataset is built, a round of data augmentation is performed that uses image transforms such as flipping, scaling, rotation etc to generate different views of the ground truth data. I also go ahead and generate the ground truth bounding boxes necessary as we're dealing with an object detection problem.
Pipeline
To deal with class imbalance, the original dataset was selectively augmented using the data augmentation described above. Classes with an average number of occurrences < 200 were randomly augmented till they had at least 200 images. Furthermore, there is an additional round of training time transformations that each image goes through.
For the EfficientDet network, the newly augmented dataset was passed through the training loop for 50 epochs on an AWS p2.xlarge GPU instance, with each epoch taking around 20 minutes on average. The data augmentation loop is highly randomized, with different runs of augmentation yielding different versions of the dataset.
For the SSD MobileNet v2 network, the data was first converted to the TFRecords format. The TFRecords data was then passed as the input to a pretrained SSD MobileNet model from the Google Coral models repository. The network was then trained for about 100000 steps(about 120 epochs) on an AWS t2.2xlarge CPU instance. The Tensorflow model was then exported to a TFLite EdgeTPU compatible model using Coral board developer tools.
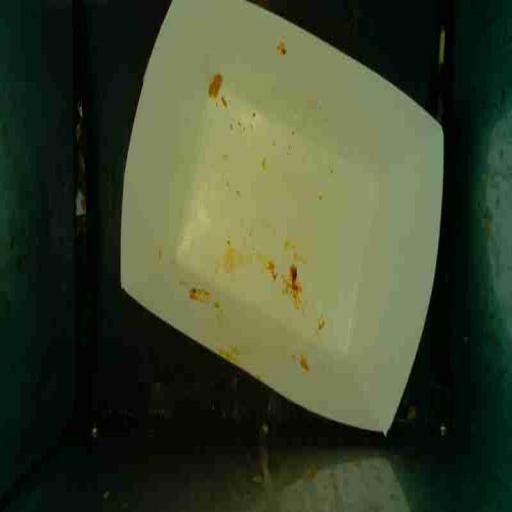
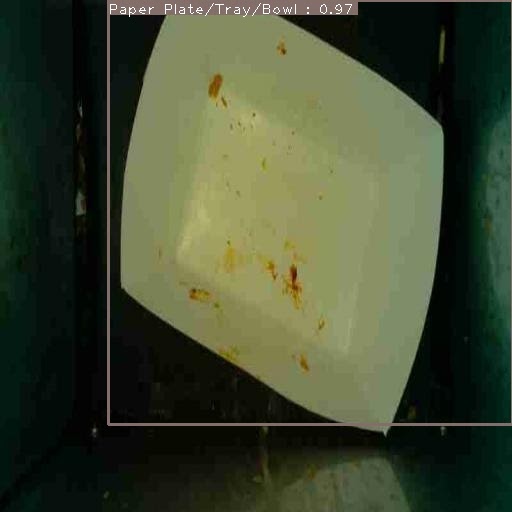
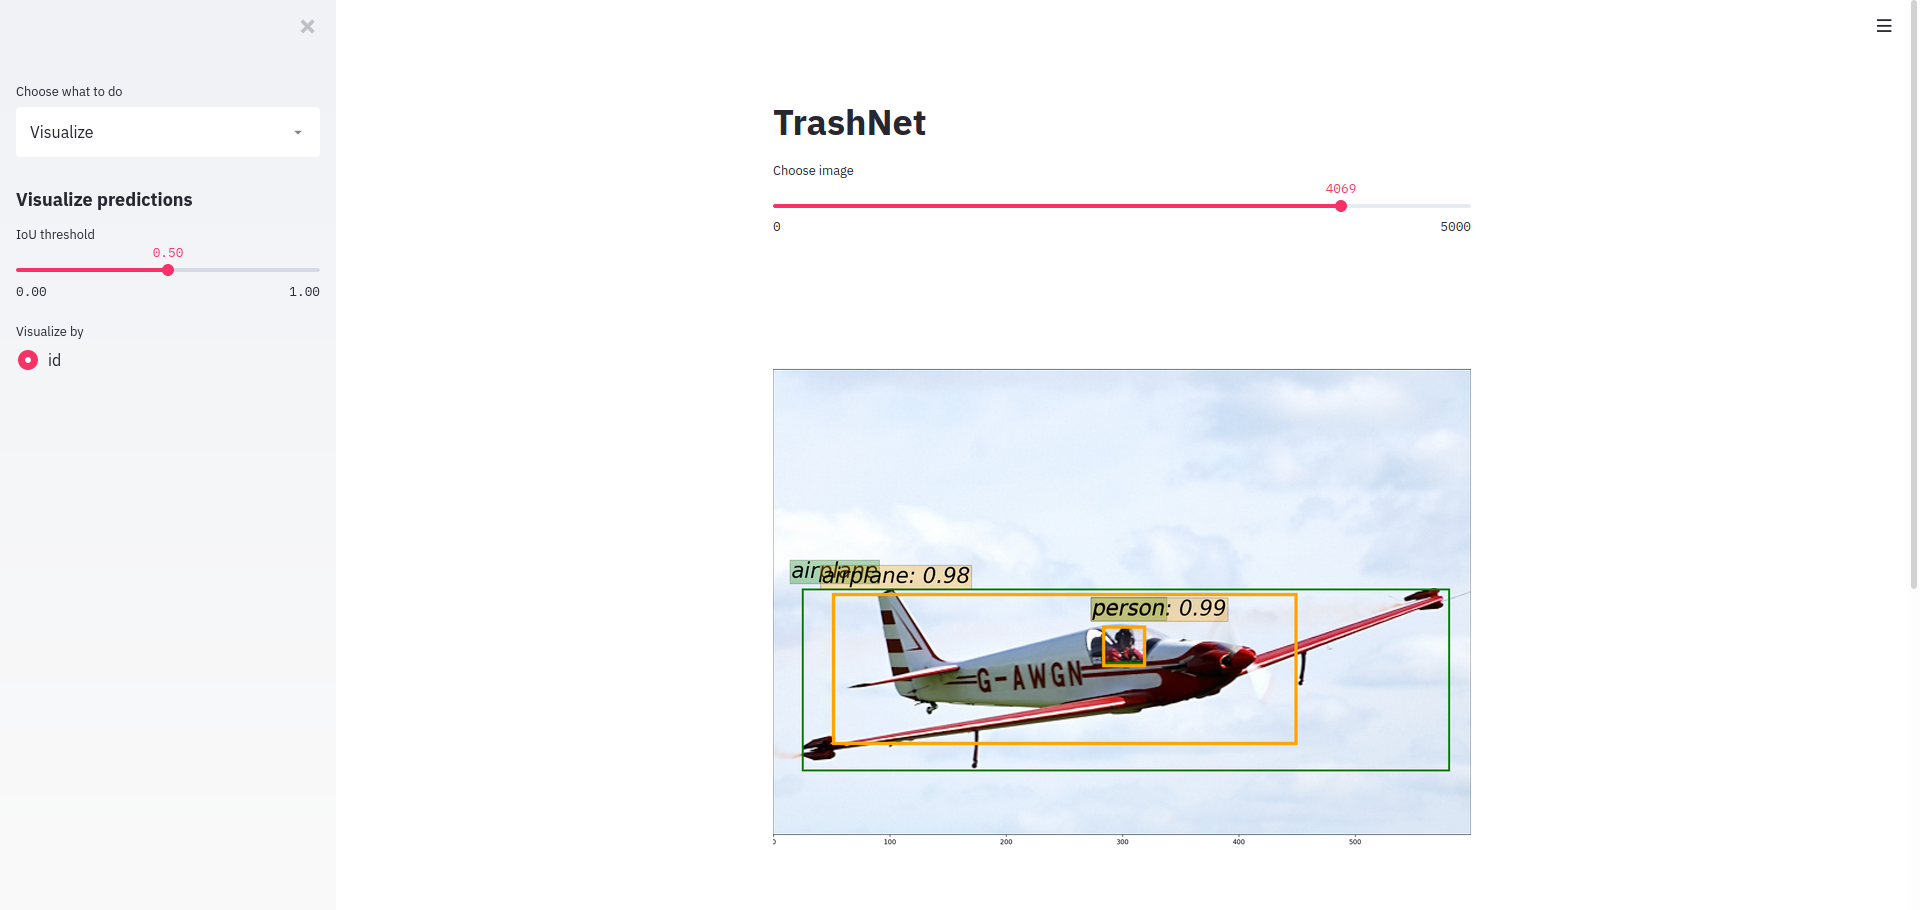
Visualizing Predictions
To visually inspect the predictions obtained from the model, I wrote a simple webapp using Streamlit. It took only a couple hundred lines of Python code, looks beautiful and is easily extensible allowing for all different kinds of summarized data presentation. The app is currently being tested interanally by the CleanRobotics team and is on track to be deployed in the early weeks of July.
Evaluation and Results
As stated above, the EfficientDet model gets an mAP score of 0.69 while the SSD MobileNet model gets an mAP score of 0.49. Stay tuned for a more detailed comparison.
For evaluation results using the COCO eval script, head to the project GitHub. The link can be found below.
Sample results: